
세일즈포스 코딩을 진행할 때 환경변수는 보통 Custom Setting(사용자 정의 설정)에 담아두게 된다.
사용자 정의 설정은 아래와 같이 Custom Settings(사용자 정의 설정)에 들어간 다음
하단의 New 버튼을 눌러 개체 생성을 진행해야 한다.


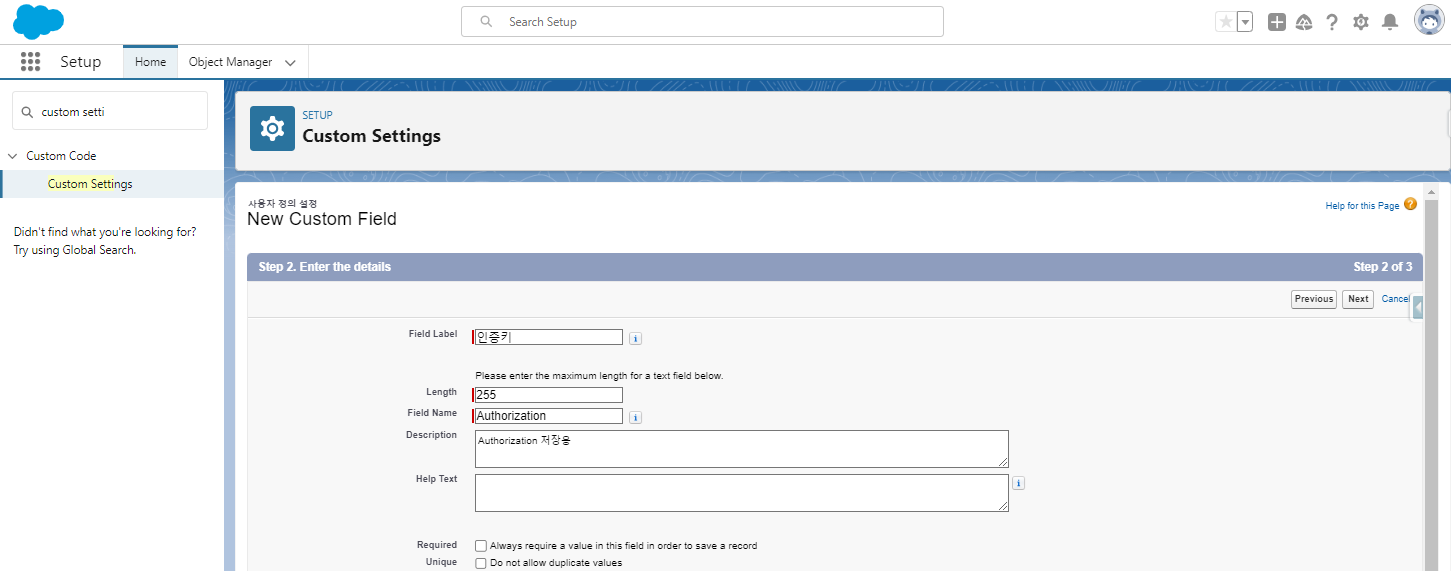
개체 설정이 끝났다면 그 이후에는 개체 내부에서 Custom Filed를 생성해야 하는데
일반적으로 필드를 생성하는 느낌으로 생성할 수 있다.


필요한 필드를 모두 생성한 다음 아래와 같이 Manage에 들어가면
해당 개체의 레코드를 생성 가능하며 상단의 New 버튼을 누를 경우 Default setting 또한 가능하다.


여기서 중요한 점은 Default를 부르는 메서드와 전체 레코드를 불러오는 메서드가 존재하는데
어차피 하나의 api마다 정해진 host, key를 공유하기 때문에 일반적으로 Default를 자주 사용한다.
Default Value를 생성하고 나면 아래와 같이 지정한 값들이 들어가 있는 것을 볼 수 있다.

가져온 값은 Custom Setting에서 만든 개체명을 통해 바로 가져올 수 있는데
대표적인 예시는 CustomSettingName__c xxxx = CustomSettingName__c.getOrgDefaults()로 개체를 가져온 다음
xxxx.FieldApi 형태로 값을 불러와서 사용하는 것으로 아래와 같이 URL, Authorization을 대체했다.
@AuraEnabled
public static String getData () {
    OutRequestWrapper reqBody = new OutRequestWrapper();
    HttpRequest httpReq = new HttpRequest();
    HttpResponse httpRes = new HttpResponse();
    CustomSettingName__c setting = CustomSettingName__c.getOrgDefaults()
    try {
        reqBody.serviceCode = 'GN00206';
        reqBody.aaaaaaa = aaaaaa;
        reqBody.bbbbbbb = bbbbbb;
        reqBody.ccccccc = cccccc;
        reqBody.reqDate = DateTime.now().format('yyyyMMdd');
        httpReq.setMethod('POST');
        // Url__c = <https://xxxxxxxxx.com> // endpoint
        httpReq.setEndpoint(setting.Url__c + '/account-search');
        httpReq.setHeader('Content-Type', 'application/json');
        httpReq.setHeader('Accept', 'application/json');
        // Authorization__c = Authorization key // Id, Password Consumer key 등 유사하게 사용 가능
        httpReq.setHeader('Authorization', setting.Authorization__c);
        httpReq.setTimeout(120000);
        httpReq.setBody(JSON.serialize(reqBody));
        httpRes = new Http().send(httpReq);

        // 응답 코드 확인
        if (httpRes.getStatusCode() != 200) {

        }
        else {

        }
    } catch (Exception e) {

    }

    return httpRes.getBody();
}
Custom Setting을 사용할 경우 테스트를 진행할 때도 해당 값을 생성해야 하는데
Default Setting을 사용할 경우에는 Name을 Default로 지정해서 미리 생성해줘야 한다.
@testSetup
    static void setup() {
        CustomSettingName__c setting = new CustomSettingName__c(
            Name = 'Default',
            Url__c = '<https://naver.com>',
            Authorization__c = 'akdj384jhsc8fh393skap='
        );
        insert setting;
    }
또한 http 반응의 경우 mock으로 응답을 진행할 수 있는데
아래와 같이 발송하면 정상적인 테스트 작성이 가능하다.
@isTest
private class ClassName_Test {
    @testSetup
    static void setup() {
        CustomSettingName__csetting = new CustomSettingName__c(
            Name = 'Default',
            Url__c = '<https://naver.com>',
            Authorization__c = 'akdj384jhsc8fh393skap='
        );
        insert setting;
    }

    private class MockHttpResponse implements HttpCalloutMock {
        public HTTPResponse respond(HTTPRequest req) {
            HttpResponse res = new HttpResponse();
            Map<string, object=""> resBody = new Map<string, object="">();
            Map<string, object=""> body = new Map<string, object="">();
            body.put('aaaa', 'bbbb');
            resBody.put('body', body);

            res.setHeader('Content-Type', 'application/json');
            res.setBody(JSON.serialize(resBody));
            res.setStatusCode(200);
            return res;
        }
    }

    @isTest
    static void getTest() {
        Test.startTest();
        Test.setMock(HttpCalloutMock.class, new MockHttpResponse());
        System.debug(ClassName.httpMethodName(param1, param2));
        Test.stopTest();
    }
}
</string,></string,></string,></string,>
진행하던 도중 refresh token을 발급받는데
인증이 정상적으로 진행되지 않았고 원인을 확인해보니 PKCE 문제로 진행되지 않았었다.
아래 이미지처럼 PKCE를 제거하면 정상적으로 진행되는 것을 볼 수 있다.

(1).백준 5074번 When Do We Finish?는 시작, 종료시간을 제공할 때
최종적으로 시작시간에서 며칠이 지났고 해당 시간을 구해야 하는 문제였다.
시작, 종료일의 기준이 존재하지 않으며 최대 96시간까지 가능하다고 했기 때문에
시작일과의 차이를 구하기 위해 시작일 부분이 24보다 큰 경우 24단위인 1440분을 날려버렸고
그 외에는 분으로 치환해 연산한 다음 padStart를 사용해 00 또는 0x 형태로 출력될 수 있게 만들어 요청대로 처리했다.
const input = `03:50 06:10
15:25 26:30
23:59 00:01
00:00 00:00`.split('\n')

const result = []

for(let i = 0 ; i < input.length - 1 ; i++){
    let [start, end] = input[i].split(' ').map(el => el.split(':')[0]*60 + el.split(':')[1]*1)
    start = start % 1440
    const day = Math.floor((start + end)/1440)
    const time = (start + end)% 1440
    const hour = String(Math.floor(time/60)).padStart(2,'0')
    const minute = String(time%60).padStart(2,'0')
    result.push(hour + ':' + minute + (day > 0 ? ' +' + day : ''))
}


console.log(result.join('\n'))'회고' 카테고리의 다른 글
| [개발일지] - 212(주말) (0) | 2024.01.28 |
|---|---|
| [개발일지] - 211(주말) (0) | 2024.01.27 |
| [개발일지] - 209 (0) | 2024.01.25 |
| [개발일지] - 208 (1) | 2024.01.24 |
| [개발일지] - 207 (0) | 2024.01.23 |